写一个Linux下搭建Discuz论坛的全过程教程。
本例使用的Linux系统为:RHEL5.3。
1.[root@linux ~]# mkdir /mnt/cdrom
2.[root@linux ~]# mount /dev/cdrom /mnt/cdrom
这是在Windows下使用VMware虚拟机运行Linux的。
先在把RHEL5.3的ISO镜像文件加载到虚拟机的光驱,然后才执行mount命令。
3.[root@linux ~]# vi /etc/yum.repos.d/rhel-debuginfo.repo
原来:
[rhel-debuginfo]
name=Red Hat Enterprise Linux $releasever - $basearch - Debug
baseurl=ftp://ftp.redhat.com/pub/redhat/linux/enterprise/$releasever/en/os/$basearch/Debuginfo/
enabled=0
gpgcheck=1
gpgkey=file:///etc/pki/rpm-gpg/RPM-GPG-KEY-redhat-release
如下图:

改成:(把原来的baseurl注释掉,在baseurl前面添加#,新添加baseurl=file:///mnt/cdrom/Server,并把enabled=0修改成enabled=1。)
[rhel-debuginfo]
name=Red Hat Enterprise Linux $releasever - $basearch - Debug
#baseurl=ftp://ftp.redhat.com/pub/redhat/linux/enterprise/$releasever/en/os/$basearch/Debuginfo/
baseurl=file:///mnt/cdrom/Server
enabled=1
gpgcheck=1
gpgkey=file:///etc/pki/rpm-gpg/RPM-GPG-KEY-redhat-release
如下图:

4.[root@linux ~]# yum clean all
5.[root@linux ~]# yum list
6.[root@linux ~]# yum grouplist 显示软件的安装包组。
Loaded plugins: rhnplugin, security
This system is not registered with RHN.
RHN support will be disabled.
Setting up Group Process
rhel-debuginfo/group | 1.0 MB 00:00
Installed Groups:
Administration Tools
Editors
Legacy Network Server
Mail Server
Network Servers
Server Configuration Tools
Sound and Video
System Tools
Available Groups:
Authoring and Publishing
DNS Name Server
Development Libraries
Development Tools
Engineering and Scientific
FTP Server
GNOME Desktop Environment
GNOME Software Development
Games and Entertainment
Graphical Internet
Graphics
Java Development
KDE (K Desktop Environment)
KDE Software Development
Legacy Software Development
Legacy Software Support
MySQL Database
News Server
Office/Productivity
OpenFabrics Enterprise Distribution
PostgreSQL Database
Printing Support
Text-based Internet
Web Server
Windows File Server
X Software Development
X Window System
Done
7.[root@linux ~]# yum groupinstall -y "MySQL Database" 安装MySQL。
8.[root@linux ~]# yum grouplist
9.[root@linux ~]# yum groupinstall -y "Web Server"
成功安装“MySQL Database”和“Web Server”之后,接着还需要安装php-mysql。
10.[root@linux ~]# yum list | grep php-* 把php相关的软件包都列出来。
11.[root@linux ~]# cd /mnt/cdrom/Server 进入软件包目录。
12.安装php-mysql,这里有个小技巧,就是输入rpm –ivh php-mysql之后,按TAB键,来实现补全这个安装包的名字。
[root@linux Server]# rpm -ivh php-mysql-5.1.6-23.2.el5_3.i386.rpm
error: Failed dependencies:
php-pdo is needed by php-mysql-5.1.6-23.2.el5_3.i386
13.出现错误需要php-pdo的依赖关系,需要把php-mysql和php-pdo两个包同时装上,这里也使用TAB键就可以补全软件包长长的名字。
[root@linux Server]# rpm -ivh php-mysql-5.1.6-23.2.el5_3.i386.rpm php-pdo-5.1.6-23.2.el5_3.i386.rpm
Preparing... ########################################### [100%]
1:php-pdo ########################################### [ 50%]
2:php-mysql ########################################### [100%]
14.[root@linux Server]# service mysqld start 启动mysql,注意是mysqld,多一个字母d的。
15.[root@linux Server]# netstat -antupl | grep 3306 查看mysql状态
tcp 0 0 0.0.0.0:3306 0.0.0.0:* LISTEN 4581/mysqld
16.[root@linux Server]# service httpd start 启动http,注意是httpd,多一个字母d的。
Starting httpd: [ OK ]
17.开启mysql和http在运行级别为3、4、5的时候开机后自动启动服务(注意mysql和mysqld,http和httpd,都多一个d字母的!)
[root@linux Server]# chkconfig --level 345 mysqld on ( level前面两个“-”减号的)
[root@linux Server]# chkconfig --level 345 httpd on
18.我把论坛的zip压缩包Discuz_X1.5_SC_UTF8.zip放在了/root目录,所以回到root的用户目录,把压缩包解压出来。
[root@linux ~]# unzip Discuz_X1.5_SC_UTF8.zip
[root@linux ~]# ls
anaconda-ks.cfg Discuz_X1.5_SC_UTF8.zip install.log.syslog upload
bbs install.log readme utility
解压出来得到一个upload文件夹,把upload里面的文件都移到/var/www/html/目录。
19.[root@linux ~]# mv upload/* /var/www/html/
[root@linux ~]# ls /var/www/html
admin.php crossdomain.xml home.php plugin.php static
api data index.php portal.php template
api.php favicon.ico install robots.txt uc_client
config forum.php member.php search.php uc_server
cp.php group.php misc.php source userapp.php
20.[root@linux ~]# chmod -R 777 /var/www/html/ 给论坛的所有文件都添加可读可写可执行的权限(注意:这里我是为了方便,把论坛的所有文件何目录都设成777是不科学的,实际情况并不需要全部777,把/config/、/data/、/uc_client/data、/uc_server/data设置成777就可以了)
[root@linux ~]# ls -l /var/www/html
total 104
-rwxrwxrwx 1 root root 2413 Oct 20 16:15 admin.php
drwxrwxrwx 7 root root 4096 Oct 20 16:15 api
-rwxrwxrwx 1 root root 741 Oct 20 16:15 api.php
.................
21.[root@linux ~]# mysqladmin -u root password 123456 设置mysql的root用户密码为123456
22.[root@linux ~]# mysql -u root -p
Enter password: (这里输入你设置的密码,输入是看不见的)
Welcome to the MySQL monitor. Commands end with ; or \g.
已经进入mysql了
mysql> grant all on *.* to root@"%" identified by "123456"; 授权,允许root用户使用密码123456访问数据库。
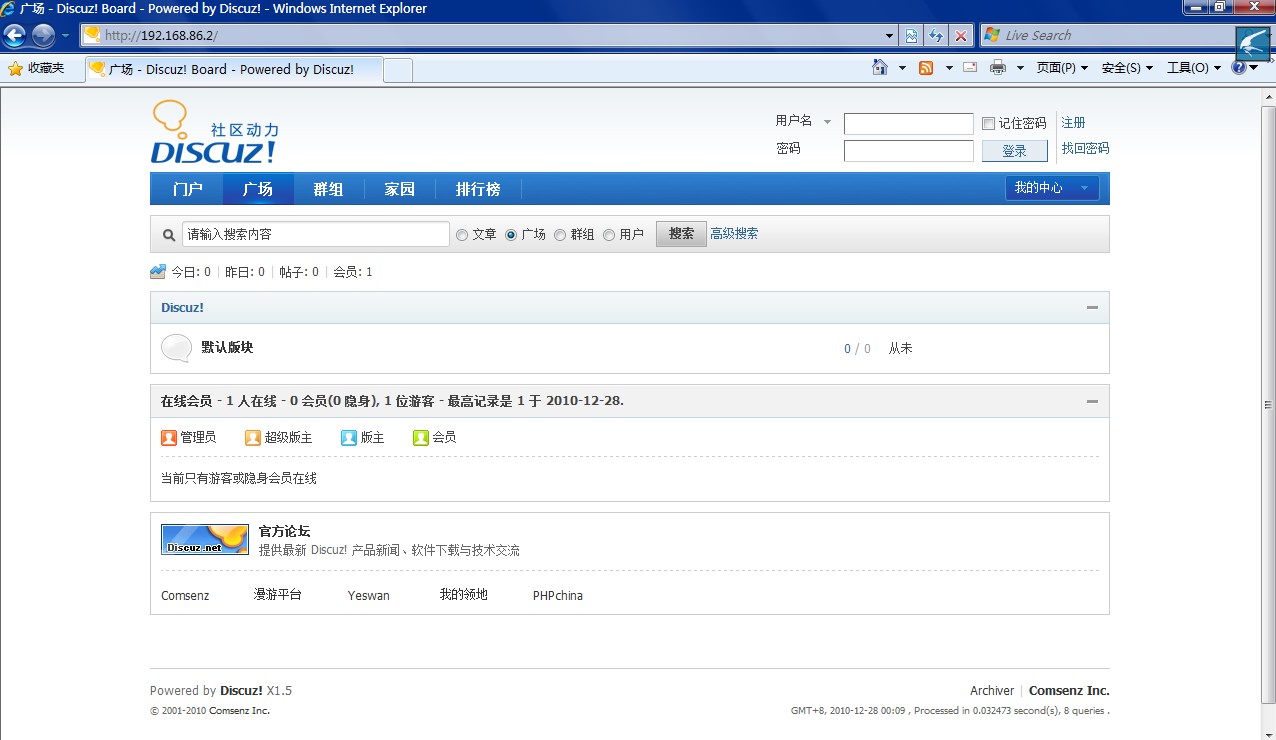
23.剩下安装论坛的操作在浏览器下完成,用浏览器打开linux服务器的ip地址,以下就看图了。
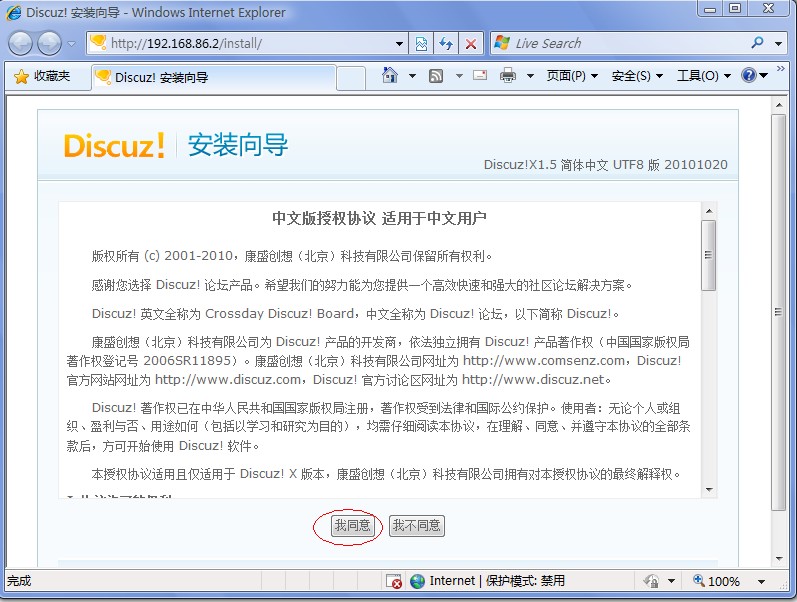
(1) 在浏览器上打开linux服务器的ip地址(记得把VMware网卡的ip和linux网卡ip设置在同一个网段),如上面图片这是我这台linux的ip:http://192.168.86.2
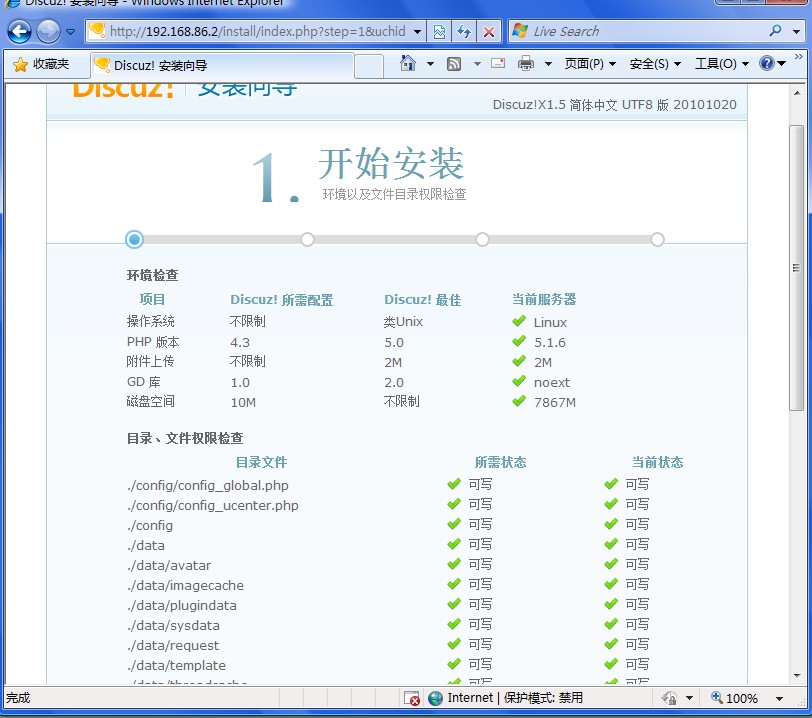

(2)上一步选择“同意”后,出现“安装向导”,上图为第一步的“开始安装”。看到没有,上面都有“绿色”的勾,如果当初没有执行 chmod –R 777 /var/www/html/ 的话,这里就会是“红色”的叉了。选择“下一步”继续。
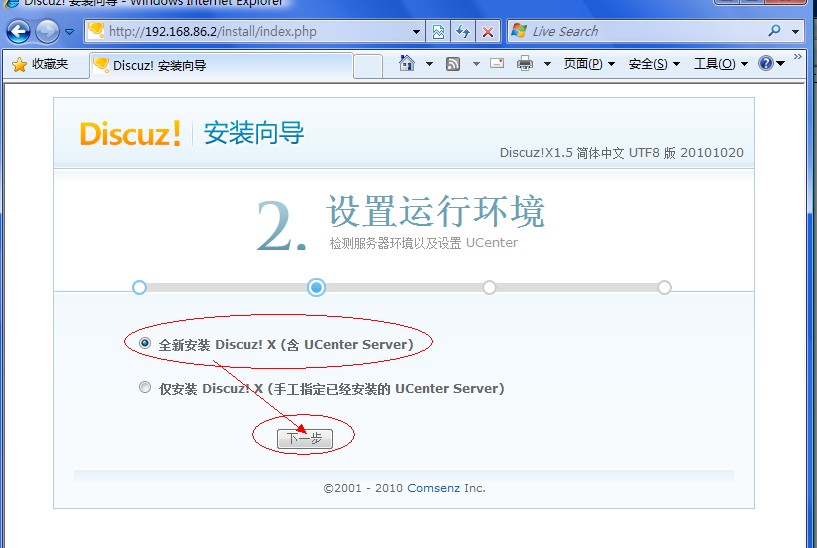
(3)安装向导的第二步,选择“全新安装Discuz!X”,当然也可以选择“仅安装Discuz!X”。“下一步”继续。
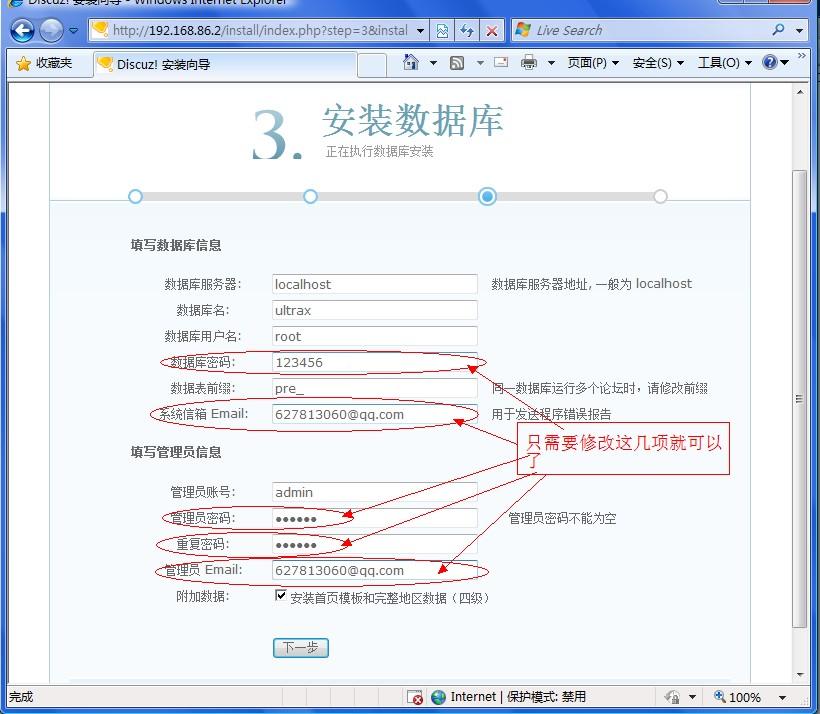
(4)看上图,只需修改用红圈圈起来的那几项。“下一步”继续。

(5)到了最后一步了。“联系方式”。“提交”。
(6)完成,上图所示。论坛安装完成了。
24.登录论坛。
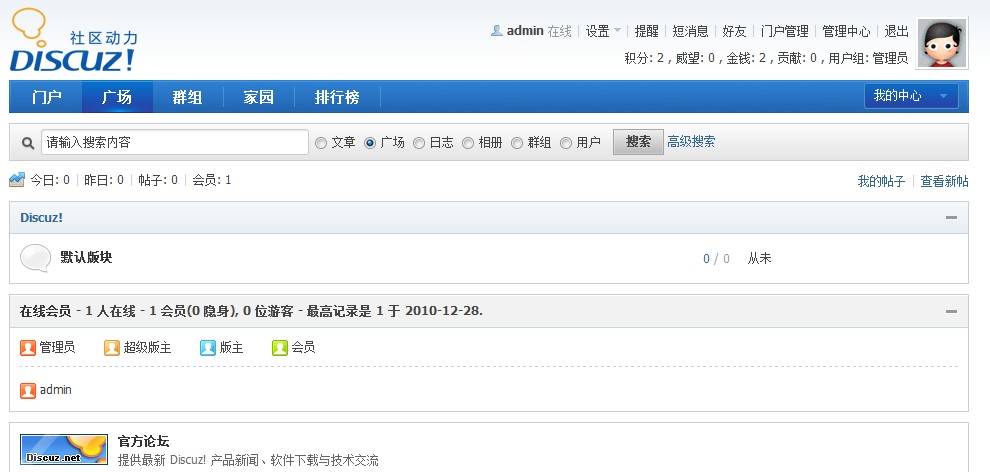
成功登录。那么,整个搭建到安装就完成了。
==
ps:最近看回,发现有些表意不够完整,修改和补了些字。
你怎么不设置首页显示摘要呢?你这样全文显示,对来访用户体验不是很好啊~~太长了!!!
@夏小淚 哈哈~谢小涙。。嗯嗯~好~会搞个摘要的~^__^
呃~~回复你的评论,我怎么找不到啊??只能回复一层的吗?
@夏小淚 我不会搞像小淚你的博客那样,可以一层层地嵌套式地回复评论,所以大家回复我的时候,就重新评论一条新的评论,嗯,是这样的。。。哈~
linux下安装的IE?
@久酷 这个我是在vista下使用VM虚拟机,RHEL在虚拟机里面,我的RHEL没有安装图形界面,所以就用vista下的IE来访问安装。
哈哈,其实一层层的嵌套式回复是有插件使用的~~~
不过你这中回复也有好处的,就是可以增多一些回复条数啊!!!!
@夏小涙 哈哈~小涙。。对不起啊。。我很多天没有管理我的博客了,现在才来回复你~ 对啊!像我的博客,大家评论一条,我回复一条,数据就上去了。。哈哈~^_^
If you could e-mail me with a few suggestions on just how you made your blog look this excellent, I would be grateful.
@nurse practitioner:Welcome to my blog~^_^ . OK.It need some plugins and the theme G7 v6,after install,them active plugins and theme.
@nurse practitioner:I had send the theme and plugins for e-mail to you,but your e-mail address was not real address.
这个教程太有用了,不过我没时间学习了,过来送个新年祝福吧!祝新年快乐!
@菠萝: 哈哈~谢谢菠萝,我祝菠萝新年快乐,身体健康,事事如意!
RHEL,额,貌似yum几下不就OK了么……
@Mucid:呃...这个....确实.... - -!!
这么幸苦折腾,囧……
@Jose:哈哈~
下次安装discuz时可以参考下
@远走高飞:哈哈~谢谢高飞这几天的到我这里捧场啊~^__^
一年没弄论坛了、怕了。折腾怕了。唉。
@耳朵的主人:呵呵~
测试十三。
@大冬瓜, 测试十四。
装完后出现禁止访问的提示:You don't have permission to access /install on this server.
怎么解决阿?
补充一下:在访问install的时候出现的。
@eaglezhao: 抱歉啊,因为我已经很久没有登陆这个博客的后台了,今晚登陆了才看到您的留言,这么迟才回复,抱歉。。我重新安装个VM虚拟机和找了个 RHEL 5.4(和本篇文写的 RHEL 5.3 对于安装论坛没有影响的)的 ISO 文件安装了,设置的过程我全程是使用 root 用户来操作的, install 目录默认为 755 权限(即 “rwxr-xr-x”),没发现您这个情形:提示没有权限访问 install 目录。您运行一下 ls -l /var/www/html/ ,看一下 install 目录的权限是否为 “rwxr-xr-x”,或者请直接尝试把 install 目录的权限提到最高,运行命令 chmod -R 777 /var/www/html/install ,看能不能解决。